My teenager stumbled into the kitchen last Saturday morning, hair disheveled and eyes barely open. “Mom, we’re out of toaster strudels,” she mumbled, staring into the empty freezer box like it had personally betrayed her. I could have made the usual grocery run, but something about her disappointed face sparked a different idea. What if we could make something even better right here at home?
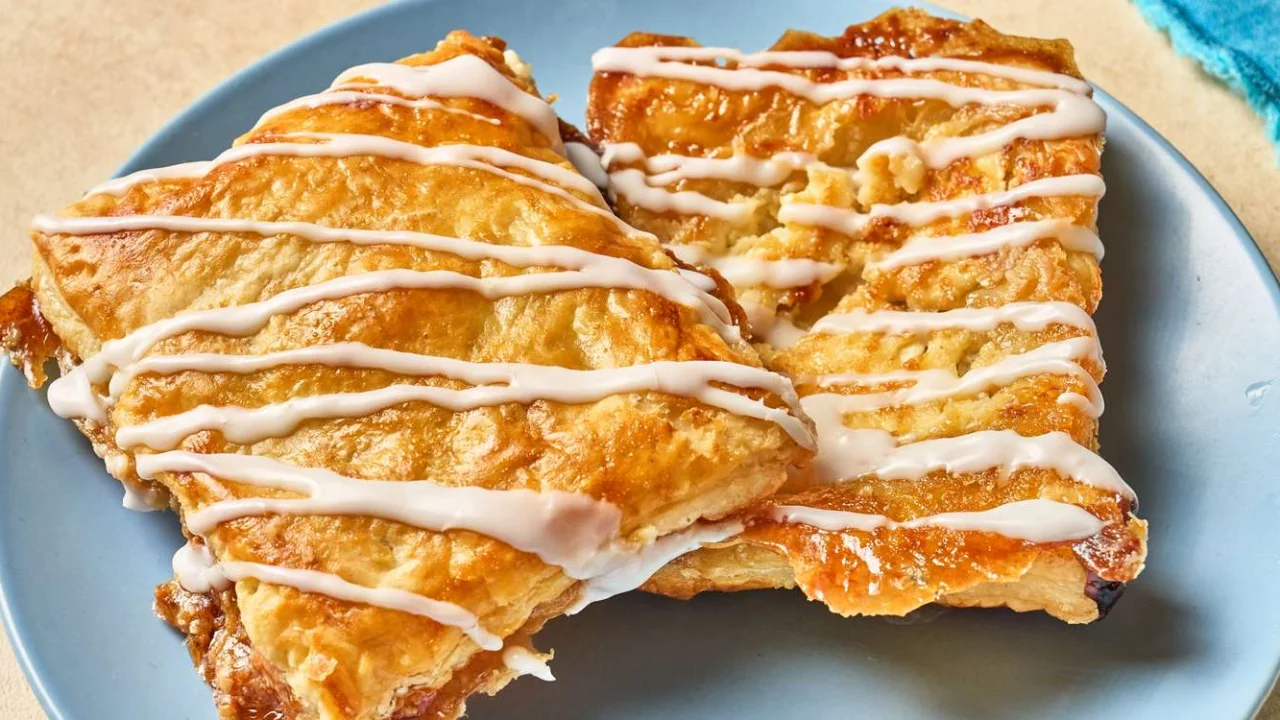
That’s how I discovered the magic of homemade cream cheese danish pastries. Instead of rushing to the store for another box of processed breakfast treats, we spent the morning creating flaky, buttery pastries that made our entire house smell like a European bakery. The best part? My daughter actually put her phone down to help.
Now, three weeks later, we haven’t bought a single box of store-bought toaster strudels. These copycat cream cheese danish treats have completely transformed our weekend breakfast routine, and honestly, they’re so much better than anything you’ll find in the frozen food aisle.
Why Homemade Cream Cheese Danish Beats Store-Bought Every Time
Making your own cream cheese danish might sound intimidating, but the reality is surprisingly different. This recipe uses simple puff pastry from the freezer section, which does most of the heavy lifting for you. The real secret lies in the layering technique that creates those perfectly gooey centers.
“The key difference between homemade and store-bought is the cream cheese quality,” explains pastry chef Maria Rodriguez, who runs a small bakery in Portland. “When you make it yourself, you control exactly how much filling goes in, and you’re using real ingredients instead of processed substitutes.”
The process involves freezing cream cheese briefly to make it easier to slice, then layering it with butter and brown sugar before wrapping everything in puff pastry. The freezing step prevents the cream cheese from melting too quickly during baking, ensuring you get distinct layers of flavor in every bite.
Unlike traditional Danish pastries that require making laminated dough from scratch, this method gives you bakery-quality results in about 30 minutes of active preparation time. The puff pastry provides all the flaky layers you want, while the cream cheese filling delivers that rich, tangy sweetness that makes these pastries irresistible.

Essential Ingredients and Equipment You Need
The beauty of this recipe lies in its simplicity. You probably already have most ingredients in your kitchen, and the specialized equipment requirements are minimal. Here’s everything you need to create perfect cream cheese danish pastries at home:
| Ingredient | Quantity | Notes |
|---|---|---|
| Puff pastry sheets | 1 package | Thaw according to package directions |
| Cream cheese | 8 oz block | Full-fat works best, freeze before slicing |
| Butter | 6 tablespoons | Cold, sliced into 12 pieces |
| Brown sugar | 6 tablespoons | Light or dark both work well |
| Egg | 1 large | For egg wash (optional) |
- Large baking sheet lined with parchment paper
- Sharp knife for clean cream cheese slices
- Rolling pin (optional, for adjusting pastry size)
- Pastry brush for egg wash application
“The freezer step for the cream cheese is crucial,” notes home baking expert Jennifer Chen. “It firms up the cheese enough that you can slice it cleanly without it sticking to your knife or falling apart.”
The brown sugar adds a caramelized sweetness that complements the tangy cream cheese perfectly. Some bakers prefer using a mixture of brown and white sugar, but the molasses notes in brown sugar create a more complex flavor profile that mimics high-end bakery pastries.
Perfect Technique for Flaky, Golden Results
The assembly process determines whether you’ll end up with perfectly layered pastries or a messy, leaky disaster. Start by preheating your oven to 400°F – this high temperature is essential for getting the puff pastry to rise properly and develop those coveted flaky layers.
Place your butter slices vertically on the parchment-lined baking sheet, creating six separate sections. The vertical placement helps the butter melt evenly and creates natural barriers between each pastry. Sprinkle brown sugar over each butter section, then top with two slices of your partially frozen cream cheese.
When cutting the puff pastry, aim for rectangles that are roughly 4×5 inches. This size provides enough dough to wrap around the filling without being too thick or too thin. Press the pastry gently around each mound, sealing the edges by pinching them together.
“Don’t worry if they look a bit rustic,” advises cookbook author David Kim. “That homemade appearance is part of their charm, and once they’re baked, any imperfections become part of the beautiful, golden-brown finish.”
For extra shine and color, brush the tops with beaten egg before baking. This creates that bakery-style glossy finish that makes them look professionally made. Bake for 15-18 minutes until the pastry is golden brown and puffed up significantly.
The most challenging part is waiting for them to cool slightly before eating. The cream cheese filling will be molten hot straight from the oven, so give them at least 5 minutes to cool down to an edible temperature.
How This Recipe Changes Your Morning Routine
Making these cream cheese danish pastries transforms breakfast from a rushed grab-and-go situation into something you actually look forward to. They freeze beautifully when unbaked, which means you can prep a dozen on Sunday and bake fresh pastries throughout the week.
Families with teenagers especially benefit from having these on hand. Instead of reaching for processed breakfast options, kids can pop a homemade pastry in the oven and have a warm, satisfying breakfast ready in 20 minutes. Parents appreciate knowing exactly what ingredients went into their children’s morning meal.
The cost savings add up quickly too. A box of six name-brand toaster strudels costs around $4, while making six homemade cream cheese danish costs approximately $3 for ingredients that taste significantly better. Over a year, families who make the switch can save over $50 while eating higher-quality food.
Weekend brunch hosting becomes effortless when you have a stash of these in the freezer. Guests always assume you spent hours in the kitchen, when in reality you assembled them in 15 minutes the night before. They pair perfectly with fresh fruit and coffee for an elegant breakfast spread.
“I started making these for my family, but now I bring them to every potluck and office gathering,” shares home baker Susan Lee. “People always ask for the recipe, and they’re shocked when I tell them how simple it is.”
FAQs
Can I make these ahead of time?
Yes, you can assemble them completely and freeze unbaked for up to 3 months. Bake directly from frozen, adding 3-5 extra minutes to the cooking time.
What if my puff pastry tears while wrapping?
Don’t worry – just pinch the tears together and continue. Small imperfections won’t affect the final result and often create interesting textures.
Can I use low-fat cream cheese?
Full-fat cream cheese works best because it maintains its structure during baking. Low-fat versions may become watery and affect the texture.
How do I store leftover baked pastries?
Store covered at room temperature for up to 2 days, or refrigerate for up to a week. Reheat in a 300°F oven for 5 minutes to restore crispness.
Can I add other flavors to the filling?
Absolutely! Try adding vanilla extract, lemon zest, or even a tablespoon of jam alongside the cream cheese for variety.
Why do I need to freeze the cream cheese first?
Freezing firms up the cream cheese so it slices cleanly and holds its shape during assembly, preventing it from mixing with other ingredients prematurely.